地図上に描画する
地図上に描画する
地図上の好きな位置にポリゴン・ライン・円・アイコン・注記・画像を描画します。
これらの持つ色、大きさ、線幅などのパラメータは自由に変更することができます。
また、以下のオブジェクトには下記のパラメータがあり、設定を変更することができます。
また、以下のオブジェクトには下記のパラメータがあり、設定を変更することができます。
- 描画優先順
- 表示・非表示フラグ
- タプ可・不可フラグ
ポリライン
地図上に2点以上の座標を追加することでポリラインを地図上に描画することができます。
ポリラインの作成にはZMSMutablePathオブジェクトでポリラインの頂点を定義して作成をおこないます。
ポリラインの作成にはZMSMutablePathオブジェクトでポリラインの頂点を定義して作成をおこないます。
ポリラインは以下のパラメータを持っており、各パラメータは変更可能です。
- 頂点座標
- 線色
- 線幅
- 描画優先度(最大124)
ZMSMutablePath *linepath = [[ZMSMutablePath alloc] init];
[linepath addLatitude:35.6271971 longitude:139.7333284];
[linepath addLatitude:35.6282725 longitude:139.7333284];
[linepath addLatitude:35.6282725 longitude:139.7347727];
[linepath addLatitude:35.6271971 longitude:139.7347727];

ZMSPolyline * polyline = [[ZMSPolyline polylineWithPath:linepath];
polyline.strokeColor = [UIColor orangeColor];
polyline.strokeWidth = 64;
polyline.map = self.ZDCview
polyline.zIndex = 64;
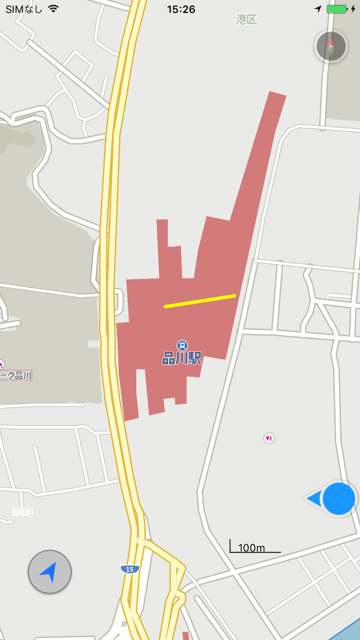
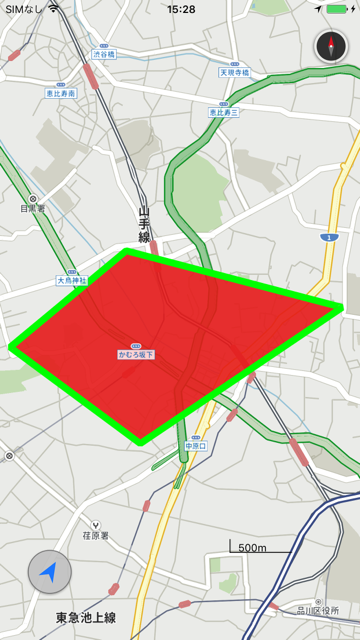
ポリゴン
地図上に好きな形状のポリゴンを描画することができます。
ポリゴンは3点以上の頂点座標を追加することで描画することができます。
ポリゴンの作成にはポリラインと同様にZMSMutablePathオブジェクトで頂点を追加して作成します。
ポリゴンは以下のパラメータを持っており、各パラメータは変更可能です。
- 頂点座標
- 塗りつぶし色
- 線色
- 線幅
- 切り抜き用頂点座標
- 描画優先度(最大124)
ポリゴンを線分が重なったり、正しいポリゴンの形状になっていない場合は、
アプリケーションが落ちる場合があります。
切り抜き用の頂点座標は必ず外側のポリゴンの内部に追加して下さい。
ZMSMutablePath *outpolygon = [[ZMSMutablePath alloc] init];
[outpolygon addLatitude:35.6342491 longitude:139.7131854];
[outpolygon addLatitude:35.6273518 longitude:139.7029643];
[outpolygon addLatitude:35.6204551 longitude:139.7144303];
[outpolygon addLatitude:35.6301967 longitude:139.7322062];
ZMSPolygon *polygon = [ZMSPolygon polygonWithPath:outpolygon];

NSMutableArray< ZMSMutablePath *> *inners = [NSMutableArray array]; ZMSMutablePath  * inner = [[ZMSMutablePath alloc] init];
[inner addLatitude:35.6288629 longitude:139.710497];
[inner addLatitude:35.6250946 longitude:139.7137857];
[inner addLatitude:35.6282232 longitude:139.7180519];
[inner addLatitude:35.632205 longitude:139.7168963];
[inners addObject:inner];
polygon.holes = inners;
polygon.fillColor = [UIColor colorWithRed:0.9 green:0.1 blue:0.1 alpha:0.9 ];
polygon.strokeColor = [UIColor colorWithRed:0.0 green:1.0 blue:0.0 alpha:1.0 ];
polygon.strokeWidth = 20;
polygon.visible = YES;
polygon.tappable = YES;
polygon.zIndex = 20;
polygon.map = self.ZDCview;
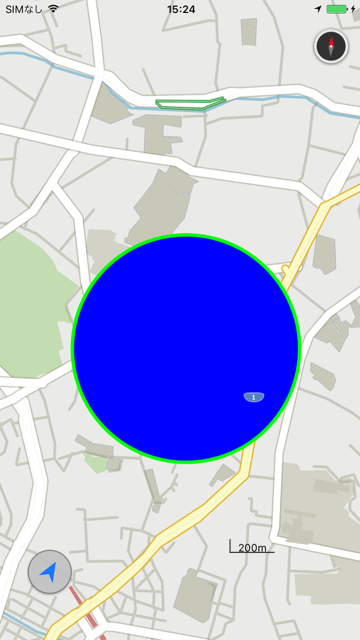
円
地図上の自由な位置に好きな大きさの円を描画することができます。 円を描画したい場所の中心位置[緯度経度]と円の半径[ m ]を指定します。 円は以下のパラメータを持っており、各パラメータは変更可能です。
- 円中心座標
- 半径 [m]
- 塗りつぶし色
- 枠線色
- 枠線幅
- 描画優先度(最大124)
CLLocationCoordinate2D center = CLLocationCoordinate2DMake(35.6369869, 139.7276729);
CLLocationDistance radius = 500;

ZMSCircle *circle = [ZMSCircle circleWithPosition:center radius:radius];
circle.fillColor = [UIColor colorWithRed:1.0 green:1.0 blue:0.0 alpha:0.5];
circle.strokeWidth = 5.0;
circle.strokeColor = [UIColor colorWithRed:0.3 green:0.8 blue:0.14 alpha:1.0];
circle.map = self.ZDCview;
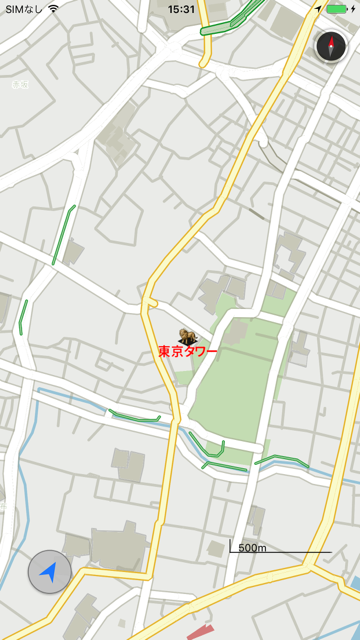
アイコン・注記
地図上にアイコンや注記を描画することができます。 アイコン・注記の描画にはZMSLabelクラスのオブジェクトを使います。 アイコン・注記には以下のパラメータがあり、各パラメータは変更することができます。
- 基準座標[緯度経度]
- 文字列
- 文字サイズ
- 文字色
- 背景色
- 背景枠線色
- 背景枠線幅
- 文字枠色
- 文字枠幅
- 背景丸みサイズ
- 背景注記パディングサイズ
- 回転角度
- 文字描画方向
- 文字描画位置(アイコンとの位置関係)
- アイコン(複数可)
NSString * text = [NSString stringWithUTF8String:"東京タワー"];
CLLocationCoordinate2D textpos = CLLocationCoordinate2DMake(35.6585783, 139.7454233);
ZMSLabel *label = [ZMSLabel textWithText:text Anchor:textpos];
label.textColor = [UIColor blackColor];
label.backgroundColor = [UIColor whiteColor];
label.textposition = 4;
label.textdirection = 0;
label.textSize = 30;
label.zIndex = 3; NSString *filePath = [[NSBundle mainBundle] pathForResource:@"icon/lion" ofType:@"png"];

UIImage *iconImage = [[UIImage alloc] initWithContentsOfFile:filePath];
NSMutableArray *icons = [NSMutableArray array];
[icons addObject:iconImage];
label.icons = icons;
label.map = self.ZDCview;
画像
地図上に好きな位置に画像を描画します。 画像は描画したい位置(バウンディングボックスあるいは中心点)を設定し、任意の画像を 地図上に描画します。 画像の描画にはZMSGroundOverlayクラスのオブジェクトを使います。 画像はアイコンとは異なり、地図の拡大・縮小によって表示される大きさが変わります。 画像は以下のパラメータがあり、各パラメータを変更することができます。
- 位置(バウンディングボックス・アンカー座標)
- 画像
- 回転角度
- 描画優先度(最大124)
画像の中心座標と表示するズームレベル(ドットバイドット)を指定して画像を表示した場合
CLLocationCoordinate2D anchorCoord = CLLocationCoordinate2DMake(35.6271971, 139.7333284);
NSString *filePath = [[NSBundle mainBundle] pathForResource:@"icon/logo" ofType:@"png"];
UIImage *icon = [[UIImage alloc] initWithContentsOfFile:filePath];

ZMSGroundOverlay *ground = [ZMSGroundOverlay groundOverlayWithPosition:anchorCoord icon:icon zoomLevel:16];

ground.anchor = CGPointMake(0.5, 0.5);
ground.bearing = 0;
ground.visible = YES;
ground.tappable = YES;
ground.map = self.ZDCview;
画像の左下・右上座標[緯度経度]を指定して画像を表示した場合
CLLocationCoordinate2D imgsw = CLLocationCoordinate2DMake(35.6271971, 139.7333284);
CLLocationCoordinate2D imgne = CLLocationCoordinate2DMake(35.6282725, 139.7347727);

ZMSCoordinateBounds* box = [[ZMSCoordinateBounds alloc] initWithCoordinate:imgsw coordinate:imgne];
NSString *filePath = [[NSBundle mainBundle] pathForResource:@"icon/logo" ofType:@"png"];
UIImage *icon = [[UIImage alloc] initWithContentsOfFile:filePath];

ZMSGroundOverlay *ground = [ZMSGroundOverlay groundOverlayWithBounds:box icon:icon];

ground.anchor = CGPointMake(0.5, 0.5);
ground.bearing = 0;
ground.visible = YES;
ground.tappable = YES;
ground.map = self.ZDCview;
以上で地図上にオブジェクトを描画する方法の説明は終わりです。